Tuesday, 16 September 2014

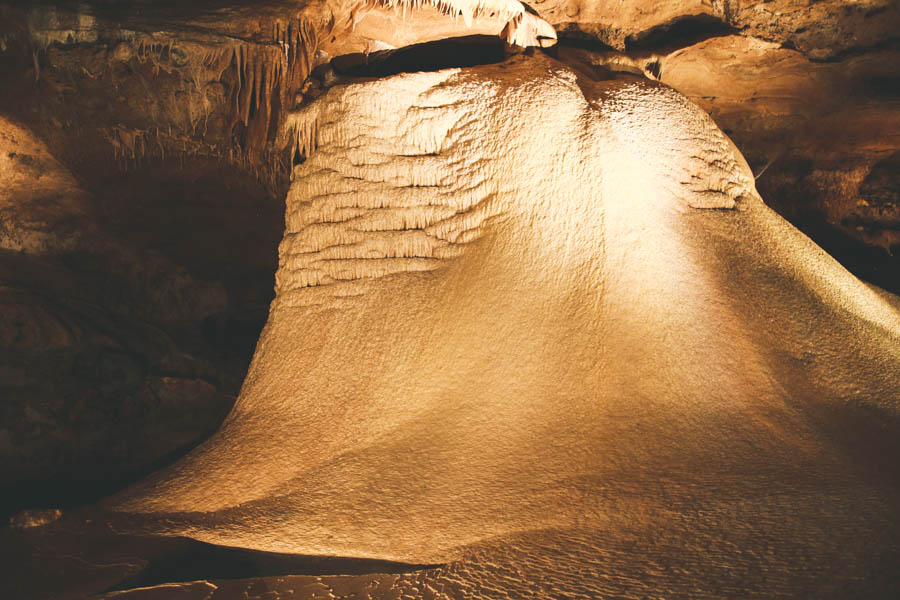
Georgetown, TX // Inner Space Caverns


I've always loved the word "spelunking" but I never realized it was only a North American term. the rest of the world calls it "caving" or "potholing." but whatever term you use, exploring a cave can be quite an experience.

while we were on our whirlwind tour of the US this summer, Husband and I dropped in to visit Inner Space Caverns on the recommendation of my sister-in-law. she lives north of Austin, Texas [we were visiting her at the time] and Georgetown was just a short drive.


the Inner Space Cavern was discovered about 50 years ago when construction workers were building I-35. they drilled down to take a ground sample and came up with nothing... and realized there must be a cave.

we opted for the shortest and least intense of the cave tours. part of the cave has been wired with electric lights and a path has been cleared and paved for easy walking [I made the trip in flip flops.] the other tours involve carrying your own flashlight, helmets, and even climbing gear.


I remember visiting Mammoth Cave in Kentucky when I was younger - this cave is a lot smaller but it packs some unique formations into a small space. our tour was maybe 3/4 of a mile in total, and all the ground we covered had something going on. my favorite part was at the end of the tour when we went down to an underground lake. it was so surreal to see the water and the reflections, knowing you were underground.

I did my best to capture things with my camera, though it was difficult without using flash or a tripod. I would definitely recommend bumping up your ISO and opening your aperture as wide as possible to compensate for the low light. [most of these were taken at ISO 800 and f/2]


there are a few bats in the cave, but they're harmless. mostly they just want to keep napping and let you move along your tour. the creepiest part for me was when Husband made a Gollum reference... ick.

other than that, we really enjoyed our morning touring the caves. it was much cooler underground [by about 20 degrees F] and it was a great way to escape the Texas summer heat. and, of course, we stopped at In-N-Out Burger afterwards... so really, a perfect morning.

linking up with Bonnie, Camila, Jessi, and Amy for Travel Tuesday.


Read more

Friday, 12 September 2014

easy gluten free pizza crust


today I want to share one of my favorite go-to toaster oven recipes: gluten free personal pizzas.

pizza has always been one of my favorite foods, and in my early days of being gluten free was the one things I "cheated" most with. in the states there are now many frozen options [Udi's is my favorite] and several pizzerias have started to offer gluten free crusts as well.

but in Taiwan... well, they haven't really gotten on the gluten free bandwagon. from time to time I can find gluten free baking mix at the import store, but never consistently. usually I have to go to Taipei, order it online, or have my parents ship some over.


this recipe was born out of trial and error [and lack of kitchen equipment] and has been made with at least 8 different brands or types of gluten free mixes. that includes the time I used pancake mix - which I wouldn't recommend but it still came out tasty.

2 1/2 cups gluten free flour [all-purpose, baking, or bread mixes work best]
3/4 to 1 cup warm water
1 room temperature egg
1 package regular yeast
olive oil
salt + pepper
italian spices such as garlic powder, red pepper flakes, rosemary, thyme, etc.


measure your flour into a large bowl and mix in the yeast packet, salt and pepper, and any italian spices you have on hand. add the egg and stir around until it forms small crumbles in the flour, then drizzle olive oil around the dough two or three times and stir again. starting with 1/2 cup, add the warm water and mix well until the dough is one consistency.

the dough will be "wet" and not much at all like traditional pizza dough. don't worry, this is ok for gluten free! drizzle some more oil on the top, cover and let sit on the counter for 1 1/2 hours.


preheat your oven to 500F [or your toaster oven to 250C] and line an 8x8 baking pan with foil. drizzle olive oil on the foil. divide dough into 4 portions - no need to mix or knead it - and press one portion into the pan so that it lays even. prick with a fork and add a little more olive oil to the top. bake for 8-10 minutes until just starting to brown, remove from the pan and repeat with the other 3 dough portions.


the crusts will be baked through, crisp but with a little give. the longer you bake it, the crunchier the crust will be. [unless you used pancake mix, then it will just get burnt.] take your pre-baked crust and cover in the sauce, cheese, and toppings of your choice. bake for another 10-12 minutes or until the cheese is bubbly.

if you like, you can freeze the crusts with or without sauce and toppings. I usually let a frozen crust thaw in the fridge a little before topping and then baking, but if it's already dressed then you should be good to go right into the oven. sometimes it takes a little longer to cook, but just keep an eye on it until your cheese gets melty.


the main reason why I make these pizzas personal size is because the only thing that fits in my Taiwanese toaster oven is an 8x8 brownie pan. but I do like smaller size because one is enough per person, and when I'm just cooking for husband and myself I can freeze the extra 2 pizzas for a quick dinner another night. having a stash of gluten free pizzas in my freezer also means I can bake my own when friends come over and order the "real" stuff that I can't eat.

individual pizzas also come in handy when there's a crowd with varied preferences. the night I shot these photos I was cooking for myself, Husband, my mother-in-law, and my two nephews. Husband wanted four cheese [mozzarella, fontina, parmesan, and goat cheese] with mushroom and onions, while I wanted to forgo the mushroom and goat cheese but add olives. and of course, my nephews declared they would not eat sauce on their pizza, only cheese and pepperoni.


I still ate their cheese-and-pepperoni-only leftovers. [actually, I ate all of the leftovers.]

this recipe has been a life saver for me... or really, a stomach saver. there was a point when I thought I would never be able to eat pizza again without having to search high and low for mysteriously obscure gluten free baking additives. but thanks to this simple crust recipe, I can have pizza. good pizza.

if you try this recipe or a variation, please let me know how it turns out! I've never tried this recipe as one full-size crust, or with regular wheat flour, so I'd be curious. regardless of its gluten content or thereof, I think we can all agree that pizza is awesome.
Read more

Thursday, 11 September 2014

currently


let's take a time out and chat about what's been going on lately around here, behind the blog. currently, I am...

sipping: NOT a pumpkin spice latte. fall has definitely not arrived in Taiwan yet. it's feels like 95F out most days. and, well... Taiwan doesn't believe in the power of the PSL so I won't be having one anyway [or a peppermint mocha this winter. humph.] regular coffee it is.

watching: True Detective. holy cow this show was good, in a really dark and twisty down-in-the-bayou way.

exploring: local cafes and coffee shops. a friend and I visited the Casa de Socrates [seriously, I love the names of things here] cafe on the nearby college campus. the shelves were stacked with books, and they had four cats... two of which were kittens. I don't think I need to say I'll be going back.

geeking: over my football cake pops being featured on the New England Patriots website. if you're a little confused [or a new reader] I used to have a baking blog and make adorable things like cake pops all the time, before I became gluten intolerant and moved to a kitchen that only has a toaster oven. when I created these cake pops in 2010 I had no idea they would turn out to be such a hit [even almost 5 years later.]

editing: my book manuscript. I don't mean with a real, professional editor. just the edits I marked up myself. but once that's done I'll be [hopefully] ready to put it in the hands of a select few trusted individuals for some feedback before I send it to a real editor.

listening to: Jungle. some friends of ours showed us their amazing videos this weekend and I can't. stop. seriously, these guys have got some moves. on roller skates, no less.

anticipating: my friend and cousin-in-law's visit in a few weeks. I love playing tour guide around Taiwan, and I'm excited to and share our home with them. and eat xiao long bao, obviously.

teaching: my Build Your Own Blog class at Husband's school. I have 8 students, all with very different ideas, and I'm excited to help them put their own blogs together. getting into the teacher mindset is a little weird for me, but I'm hoping it gets easier as the semester goes on.

bugging out: over bugs. we found another cockroach in the apartment. lucky number ten was actually a live one. Husband had to squish it for me. and then the next day I discovered a spider, who escaped my efforts to end him. oh, the joys of living in a tropical climate... time to get sprayed again.

planning: our trip to New Zealand next year. I am so excited. like, fireworks-cartwheel-homerun excited. we are still in the early stages of figuring out where all to go, what to see when we get there, and how to travel between. I think we are going to be using a blend of car rentals, camping gear, trains, and camper vans. if you've been to NZ and have any suggestions, hook me up with some links below!

Read more

Tuesday, 9 September 2014

tips for visiting Tokyo Disneyland


one of my best friends is currently exploring Walt Disney World in Florida, and it's making me jealous reminisce about our visit to Tokyo Disneyland last May. lucky for me [and you!] I realized that there was still a handful of photos and a TON of tips and tricks that I had neglected to share in my previous Disney posts. so, here you go:

getting there + getting around

if you are arriving in Tokyo by plane, you can get to Disneyland from Narita or Haneda airports by either bus or train. [we opted for the bus since it's a direct shot, about 1 hour drive from Narita.] once you arrive at the resort area, the best way to get around is by the monorail [which is called the Disney Resort line here.] we opted to stay in one of the partner hotels, the Hilton Tokyo Bay, which had a free shuttle bus that ran to the monorail station... though it was close enough to walk to the station. we bought a multi-day pass and really got our money's worth. one ride is 260 yen [about $2.60 USD] and if you plan to ride more than once between the park + hotel [we came back for lunch each day] it is worth getting the daily pass. I would also recommend staying out by the parks so that you can leave the park for more variety and less expensive meal options. the Ikspiari shopping complex contains restaurants of varying price levels, along with a grocery store. our hotel also had a small take-out deli and a decently stocked convenience store.

be prepared

when I checked the weather forecast for our trip to Tokyo Disneyland, it was supposed to be 80F and sunny. our second day was definitely bright and we were glad to have packed sunscreen. but our first day we had 70F and rain. this worked in our favor to keeps the crowds down, but it did mean investing in some snazzy $20 souvenir umbrellas. many of the shops sell umbrellas [ranging in price from $12 to $40 USD, and we spotted some $5 ponchos at the Pooh store. especially in the spring, you should come prepared with rain gear [or be prepared to purchase in the park.]


popcorn wagons


one thing that you MUST eat while at the park is the popcorn. Tokyo Disney is unique in that it offers a variety of popcorn flavors that can be found at different locations in the park. when we visited, the flavors were: caramel, salt, soy sauce + butter, curry, honey, strawberry, and soda. initially we had planned to try them all, but we fell in love with the curry popcorn [seriously, it was amazing] and ended up eating mostly that. each wagon offers a different souvenir bucket which costs $18.50 initially, and $5.20 per refill. we went with a classic Mickey bucket [at the soy sauce + butter wagon] and went through 3 or 4 curry refills. you can also buy a smaller carton at any stand for $3.10, but having the bucket was perfect for snacking while walking around or waiting in line. plus... it's adorable.


buying souvenirs


the selection of souvenirs was definitely not what I expected. the most popular characters seemed to be Mike and Sully from Monster's Inc, Chip and Dale, Cheshire Cat from Alice in Wonderland, Winnie the Pooh, Toy Story, Marie from Aristocats, and obviously Mickey and Minnie. many of the stores in the park carry similar merchandise, but a few unique items are only found in stores near that character/theme ride. the princess options seemed to be limited to Cinderella, Snow White, Ariel, Sleeping Beauty, and a little Rapunzel. we did most of our shopping on our second day, after we had scoped out all the options for what to buy and where. we also found that the "Bon Voyage" shop and the Disney Store in Ikspiari carried additional items that couldn't be found in the park.


using fastpass


I've never used fastpass at a Disney park before, but if you visit Tokyo it will be your new best friend. the way they operate fastpass at these parks is a little different from anywhere else [or so I hear] and it makes it even faster for you if you hold a pass. the downside? standby wait times can get long and you will be frustrated watching everyone zoom by while you stand still for 20 minutes. depending on the time slot and how many passes each ride has, the fastpass to standby admittance ratio can go up to 10 to 1. [no really, we counted. 8 standby went in for every 75-80 fastpass at Pooh's Hunny Hunt] the two rides you absolutely want fast pass for are Hunny Hunt and Monster's Inc, though they come in handy for any of the coaster rides [Space Mountain, Big Thunder Railroad] or Splash Mountain.


have you ever been to Tokyo Disneyland - or another Disney park? do you have any tips to add to this list?


linking up with BonnieCamilaJessi, and Amy for Travel Tuesday.
Read more

Wednesday, 3 September 2014

DIY washi tape notebook


I don't think it's a surprise to anyone that I love washi tape. I've used it for a variety of projects, including photo displays, creating paintings and word art, just plain decorating my walls, and even for manicure inspiration. today I'm going to show you another ridiculously easy DIY project - how to cover your notebook with washi tape.


start by selecting your tapes. I'm realizing now that my colors look a lot like Christmas... in real life the greens are more minty and the pink is less red and more pink. or maybe I should use this notebook to get a head start on making my Christmas lists?

anyway. you'll also need a blank notebook. I used white since some of my tapes were a bit transparent, but another solid color would work well. you could also use a notebook that already has art on it and come up with something really interesting.


start by cutting a straight edge on your tape, then run your first color along the top edge. if it's not straight, just pull the tape up and reposition. cut a little excess tape and fold per to the inside cover of the notebook. add your second tape, your third tape, and so on.

I decided to keep things simple with just horizontal stripes, but you could go vertical or diagonal, or even weave or cut sections of the tape to create a pattern.


I initially added a vertical strip along the wire to reinforce it, and then removed it because I decided I liked the look better without. that's one of the great things about working with washi tape... removability!

this project was really easy and I'm tempted to cover all my notebooks and planners now. this would be a great way to personalize your notebooks for school, or make a cute journal to give a friend. washi tapes come in so many colors and patterns now, the possibilities are endless.


linking up with Nicole for treat yo self Thursday
Read more

Tuesday, 2 September 2014

Taipei // Stray Cats Cafe


I love cats. and I especially love kittens. leaving our two cats behind when we moved abroad was one of the hardest parts of becoming an expat. so when my brother came to Taiwan and said he wanted to visit a cat cafe - a place where you can sit and play with kittens for as long as you like - I was all in.


the concept of cats and coffee might seems a little strange, even more so the concept of cats and eating. but cat cafes are a big deal in Asia, where many people don't have pets. you can come to the cafe and play with animals, sip a latte, read a book, and just hang out.


we selected the Stray Cats Cafe in Taipei to visit, since I had found a blog post recommending it and stating that most of their cats were still kittens. this cafe is also great because all their kittens are up for adoption! they take in strays and then help to find them homes. a few of the cats are older, and act as mothers for the little ones.


we arrived to find a crowd of children chasing around playing with the kittens. there are plenty of cat towers and feathery wands and toys to keep them occupied, and they are all very friendly with the cafe visitors. soon the kittens were tired out and realized they could come hide sleep on/near our table. we didn't mind.


I pretty much didn't want to leave... ever. but dumplings were calling my name, and we had other things to see in Taipei. a cat cafe was the perfect place to sit [in air conditioning] and have a drink while enjoying some serious adorableness. I'm planning to head back soon to get my kitten fix!

linking up with Bonnie, Camila, Jessi, and Amy for Travel Tuesday.
Read more

Monday, 1 September 2014

hello, september


consider this your obligatory oh-my-god-it's-september statement.

I'm sitting in my office - aka the Starbucks across the street. they remodeled it while I was gone this summer. it looks lovely, but now I need to figure out which tables give me the best writing mojo all over again. they sadly did not remodel their music selection, so instead I'm listening to the Guardians of the Galaxy soundtrack. [which, to be honest, is probably better than anything they would play anyway.]

in some ways it feel like this summer was a dream... all the bacon, time spent with family and friends,  Lake Michigan sunsets. slipping back into hot + humid life in Taiwan for the third year in a row has been both easy and difficult. I could extrapolate that statement into a ten page essay, but let's just leave it for now and move on. Taiwan has made a few improvements [other than the Starbucks] while I was gone. Ive noticed that more items in the local stores have English labeling. the selection of ciders has practically doubled. and best of all, we discovered real barbecue sauce and sriracha hot sauce at the import store this week.

with all the indulging we did in the states, we've been trying to stay healthy since we got back. we've been eating pescatarian at home [just veggies + fish] and Husband has been teaching me how to lift weights. I'm hoping to find a short race to run in the next few months, and trying to work yoga into our schedule too.

the end of august means things are about to get a lot busier. today is the first day of school, and tomorrow I'm teaching my first blog class. I have a lot of emailing to catch up on, a million post ideas to flesh out and photograph, and there's that whole book thing too. we're trying to assemble a routine that will allow us to be healthy + productive, but still leave time for fun.

sounds like it's time to set some goals to stay on track.

this month I want to:

- update my manuscript with the edits I made this summer
- do pushups every day
- get back on the envelope budget
- transfer music + photos to my new laptop
- blog at least 3 times per week

it's time to hit the reset button, wipe the slate clean, and get to work. bring it, september.

linking up with Melyssa for weekly wishes.


the cup of coffee that fueled the writing of today's post was sponsored by couchteacher.com, a marketplace for one-on-one language lessons via webcam. stop by and check it out!
Read more